Why teach Copilot new skills?
What a skill actually is
If you’re ready to teach Copilot some new tricks, Agent Skills are your answer. Built on the agentskills.io open standard, a skill is a folder of instructions and tools that Copilot only opens when it’s relevant to what you’re working on. It’s an assistant who knows which reference book to grab off the shelf, instead of one who dumps the whole library on the desk every time.
Loading only what’s needed
Loading everything at once would slow Copilot down and fill its context with things that don’t apply to the file you’re in. Agent Skills use progressive disclosure to pull in targeted context only when it matters, so responses stay fast and stay on topic.
The problem: generic AI responses
One-size-fits-all answers
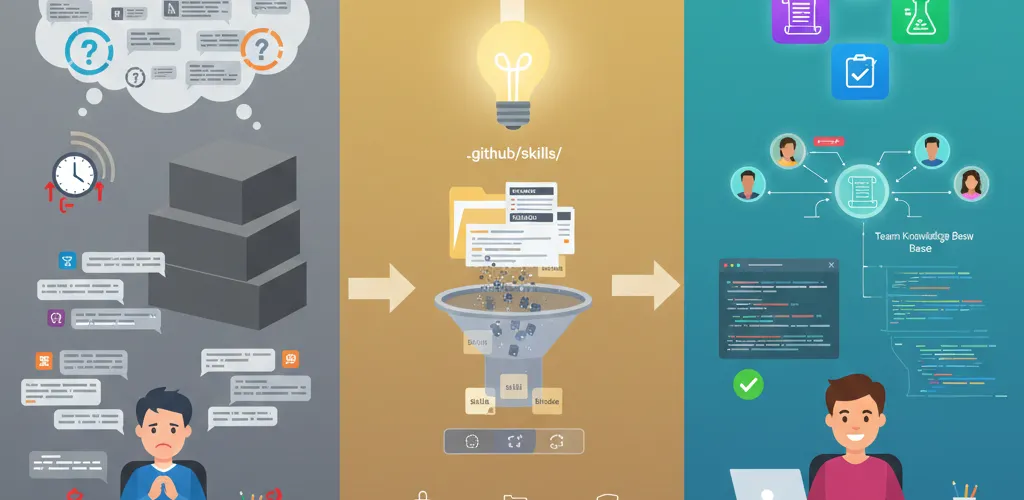
Out of the box, Copilot is helpful but generic. It doesn’t know your team’s workflows, your project’s naming conventions, or the specialized tasks you run every week. So you type the same explanations over and over, session after session.
Context overload
Explaining everything upfront causes two problems. It slows every response down. And Copilot’s answers get muddier, because the signal you care about is buried in the context you pasted.
Repeating yourself
Without skills, every new coding session starts from zero. You re-explain the same project patterns, and the explaining never turns into anything you can reuse.
The fix: repository-based Agent Skills
How Agent Skills are organized
Agent Skills are folders that live in your repo, or in your user profile. They hold instructions, scripts and tools that Copilot can reach for when needed. The format is portable across agents, including GitHub Copilot in VS Code, the CLI and the coding agent.
The three-level loading system (progressive disclosure)
To keep things efficient, Agent Skills use a three-level loading system:
- Level 1: skill discovery (always on): Copilot reads the
nameanddescriptionfrom the YAML frontmatter of every availableSKILL.md. This is lightweight and helps it decide if a skill is relevant. - Level 2: instructions loading: When a skill matches your prompt, Copilot loads the full body of the
SKILL.mdfile. - Level 3: resource access: Copilot only accesses additional files (scripts, templates, examples) in the skill directory as needed.
Knowledge that stays put
Skills live in your repository, so the .github/skills directory travels with a clone and shows up in code review like any other change. Nobody has to configure anything to get them.
Setting up your first skill
Step 1: create the skills directory
First, pick where your skills folder lives. Recommended locations:
- Project skills:
.github/skills/(recommended) or.claude/skills/(for backward compatibility). - Personal skills:
~/.copilot/skills/(recommended) or~/.claude/skills/.
Say you pick .github/skills. Here’s how you’d set it up:
# Create the main skills directorymkdir -p .github/skills
# Create a specific skill foldermkdir .github/skills/image-resizer
Inside that main folder, create a subfolder for each specific skill you want. Name them something clear like image-resizer or webapp-testing.
Step 2: write the SKILL.md file
Every skill needs a SKILL.md file (uppercase) with YAML frontmatter at the top. Spend your time on the description, because that is the only text level 1 discovery sees when it decides whether to load the skill at all.
Here’s a real example:
---name: 'Image Resizer'description: 'Automatically resizes and optimizes images for web use. Handles batch processing, maintains aspect ratios, and generates responsive image sets. Use this when working with image assets that need multiple sizes or optimization.'---
# Image Resizing Workflow
First, I'll check what you're starting with:
- Look at source image dimensions and format- Figure out what target sizes you need- Make sure the output directory exists
Next, I'll handle the actual work using the [optimization script](./scripts/optimize.js).
Finally, I'll verify the output quality and file sizes.Notice how the description names concrete things: batch processing, aspect ratios, responsive sets. That specificity is what makes Copilot pick the skill up when you mention images or resizing.
Step 3: add scripts and resources
This is where skills get more useful than a prompt file. You’re not limited to instructions. You can bundle JavaScript scripts, templates and configuration files alongside your SKILL.md, then reference them with relative paths.
Here’s what your folder structure might look like:
.github/skills/image-resizer/├── SKILL.md├── scripts/│ ├── resize-images.js│ └── optimize.js└── templates/ └── config-template.jsonThen in your SKILL.md, you can tell Copilot about these files:
## Tools Available
To resize images, run: `./scripts/resize-images.js`
For optimization, use: `./scripts/optimize.js`
Configuration template: `./templates/config-template.json`Now when you ask Copilot to resize images, it points at the script that already exists and has been tested, instead of writing you a fresh one that has not.
Step 4: enable skills in VS Code
This feature is currently in preview, so you’ll need VS Code Insiders to try it out. Here’s how to get it working:
- Open VS Code (or VS Code Insiders)
- Open Settings (press
Cmd+,on Mac orCtrl+,on Windows/Linux) - Search for “Agent Skills”
- Ensure the experimental skill support is enabled
You can also enable it via .vscode/settings.json if you prefer:
{ "chat.useAgentSkills": true}Worth knowing
Copilot’s “Agent Mode” (Windows & Linux: Ctrl+I, Mac: Cmd+I) is highly optimized for using these skills autonomously. For the best experience, try invoking Copilot in Agent Mode when working with your custom skills.
Once it’s enabled, test it. Open Copilot chat and ask “What skills do you have?” If the wiring is right, Copilot lists your new skill and summarises what it does. If it doesn’t, your frontmatter is usually the problem.
Skill examples
Documentation generator
Say your team has a style guide for docs. A skill can hold those conventions so generated documentation comes out in your format rather than a generic one.
---name: 'Documentation Generator'description: "Generates API documentation following the team's style guide. Includes TypeScript examples, parameter descriptions, and usage patterns. Use when documenting new functions or API endpoints."---
## Documentation Format
Each function should include:
1. Brief description (one sentence)2. Parameter table with types and descriptions3. Return value explanation4. Code example showing typical usage5. Common gotchas or edge cases
Example template is in `./templates/api-doc.md`Test suite builder
Tired of writing the same boilerplate test code? Build a skill that knows your testing patterns and can scaffold a whole suite.
---name: 'Test Suite Builder'description: 'Generates comprehensive test suites using Jest and React Testing Library. Covers happy paths, edge cases, and error scenarios. Use when creating tests for new components or utilities.'---
## Test Structure
For each component/function, generate:
- Setup and teardown blocks- Happy path tests- Edge case coverage- Error handling tests- Mock setup when needed
Refer to `./examples/sample-test.spec.ts` for the pattern.Code review checklist
Your team’s review standards can go into a skill too, so the checklist runs on the PR instead of living in a wiki page nobody opens.
---name: 'Code Review Checklist'description: 'Provides a comprehensive code review checklist based on team standards. Covers code quality, security, performance, and testing. Use when reviewing pull requests.'---
## Review Criteria
### Code Quality
- [ ] Functions are under 50 lines- [ ] No console.logs in production code- [ ] Meaningful variable names- [ ] Comments explain "why" not "what"
### Security
- [ ] No hardcoded credentials- [ ] Input validation on all external data- [ ] Proper error handling without exposing internals
### Testing
- [ ] Unit tests for new functions- [ ] Integration tests for API endpoints- [ ] Coverage above 80%What you get out of it
Less repetition
The saving shows up in the explaining you stop doing. No typing out the same conventions every morning, no digging up the doc you wrote six months ago to paste into chat.
Tasks that used to take three or four rounds of correction land closer to first try, because the context Copilot needed was already loaded.
Knowledge the whole team can use
Skills move institutional knowledge out of people’s heads. The pattern the senior dev always uses, the workaround for that one API quirk, the commit message format you keep correcting in review: put it in a skill and it applies to everyone.
New hires come up to speed faster because the knowledge is in the repo they just cloned.
Consistent output
Copilot follows the same patterns each time, so you stop getting one suggestion today and a different one tomorrow for the same kind of change.
Automation, not just advice
Bundling scripts with the instructions is the part I’d not give up. Copilot can run your image optimizer, generate the boilerplate, execute the tests. Advice you have to implement and a script that already works are not in the same category.
Quick Reference
-
Create Skills Directory: Choose a location (
.github/skills/,.copilot/skills/, or.claude/skills/) and create a subfolder for your skill.
Terminal window mkdir -p .github/skills/my-skill -
Create SKILL.md: Inside your skill folder, create a
SKILL.mdfile with YAML frontmatter includingnameanddescription.
.github/skills/my-skill/SKILL.md ---name: 'My Skill'description: 'Brief description of what this skill does and when to use it.'--- -
Add Resources: Include any scripts, templates, or additional files your skill needs in the same folder.
Terminal window mkdir .github/skills/my-skill/scripts -
Reference Assets: Use relative paths in
SKILL.mdto point to your scripts or templates.
.github/skills/my-skill/SKILL.md To run the script, use: `./scripts/my-script.js` -
Enable in VS Code: Turn on Agent Skills in VS Code settings by enabling
chat.useAgentSkills.
.vscode/settings.json {"chat.useAgentSkills": true} -
Verify Setup: Open Copilot Chat and ask, “What skills do you have?” to confirm your skill is recognized.
Next steps
Don’t try to write the perfect skill first. Start with one small task you do constantly. Generating test files in your team’s format, say, or the checklist you run before a production deploy.
Get that working. Watch how Copilot uses it, because the first description you write is usually too vague to trigger reliably. Then add scripts and templates once the plain version earns its place.
As the library grows, Copilot stops behaving like autocomplete and starts behaving like someone who has read your codebase.
The write-up is a one-time cost, and the skill stays in the repo for whoever clones it next.